Showing posts with label genealogy software. Show all posts

Monday, July 23, 2018

Ancestry's "We're Related" App

We're Related app
My relationship to Stephen Amell
is confirmed
Edit to add Mar 28, 2019: Since publishing this article, it's come to my attention that the We're Related app is no longer available from app stores to download. It will still function if you still have it on your device, but you can no longer download it. I contacted Ancestry.com support about this, but they refused to give me any information on when and why the discontinuation happened and why there was no announcement, and instead flat out denied that they even owned the app (see below). Maybe they sold it at some point, but they most definitely owned it at one point, as proven by older community/Facebook topics answered by Ancestry reps as though they manage or own it found here in 2017 and here in 2016. So I've now asked them if they sold it, when and why did that happen and why was there no announcement. No response yet.

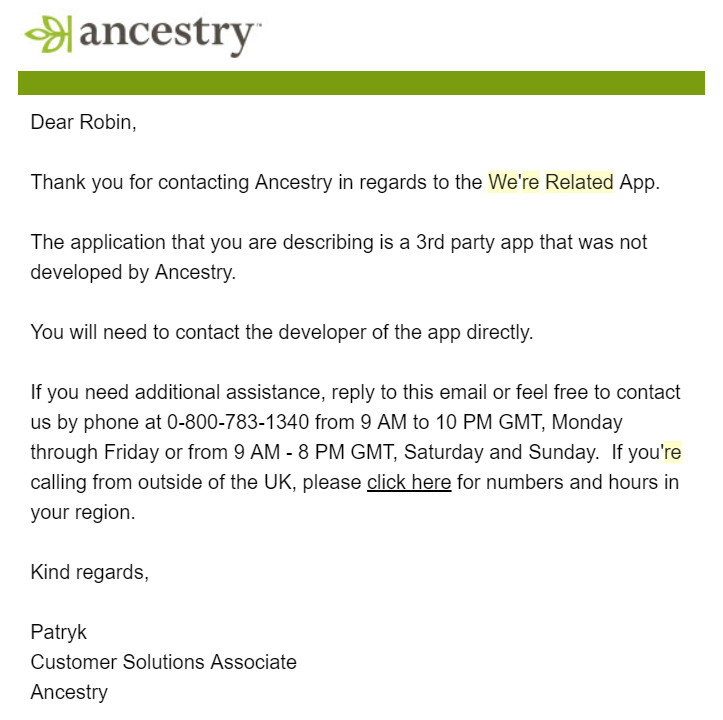
I know it's only a little app that produces a lot of false connections, but this lack of communication and transparency with their paying customers is just so typical of Ancestry.com.

Edit to add July 29, 2019: Ancestry.com have finally recently sent out an email about the discontinuation of the We're Related app, and added a help article detailing the same, available here. How odd that they would finally announce the discontinuation of an app they claimed they didn't even own back in March. While it's nice to finally see some acknowledgment of this, it just highlights the fact that their customer service reps either don't know what they're talking about or are just flat out lying.

Ancestry's denial that they ever owned the app which they've
now finally announced has been discontinued.


--------------- Original article:-----------------

As many of you may know already, Ancestry.com has an app available called "We're Related". It's a fun little app that looks at Ancestry's vast database of user created family trees and attempts to find common ancestors between you and famous people, both of today and in history. It probably goes without saying that you should be careful about accepting the authenticity of the connections the app makes, given that it's based on user created trees and we all know how error-filled they can be, but that doesn't mean it can't be accurate sometimes.

Out of curiosity, I set out to determine how many of the famous people it's claiming I'm related to are actually accurate. Admittedly, I haven't gotten very far because most of the common ancestors the app finds are colonial, meaning they can be difficult to research. That doesn't mean the app is wrong, just that a lot of them can't be confirmed or denied either way. But so far, I have been able to confirm one link, and deny another.

I started with the ones who had common ancestors I recognized because they were already in my own tree (the app will extend on your tree to find common ancestors even further back than you've researched). That way, I at least knew my own descent from that common ancestor was accurate, and only had to research the path from the common ancestor to the famous person in question.

So the first famous person I've been able to confirm my relation to is Stephen Amell (shown above). For those of you who don't watch the TV show "Arrow" based on the D.C. Comic's superhero Green Arrow, Stephen Amell is the star of the show (also, you're missing out). He's not exactly an A-lister but it's still pretty cool. Additionally, although the app doesn't mention it, Stephen Amell's cousin is Robbie Amell, who had a brief part in the corresponding TV show, The Flash, and it's their shared ancestry which I also share so I'm related to both of them. Our shared ancestors are Jacob C Gottschalk, who was the first Mennonite bishop in America (not to be confused with the first Mennonite minister in America, the more famous William Rittenhouse), and his wife Aeltien Symons Hermans. My path to Jacob is well documented, since he was a somewhat well known historical figure, at least among Mennonite history, his descendants are well documented, which made researching down to Stephen and Robbie Amell fairly easy as well. Jacob was my 7th great grandfather and Stephen's 9th great grandfather, making us 8th cousins twice removed.

App shows the path from alleged
common ancestor to the Cole
family
Sadly, not all the connection are this easy to confirm, nor are they always so accurate. I went after another suggested relation, Nat King Cole (shown right). The app seemed to think we shared ancestors Peter Schumacher and his wife Sarah Hendricks. Again, these ancestors were already in my tree so I knew they were accurate and only needed to research down Nat King Cole's side. On his path, the app suggested that Peter and Sarah's daughter was Fronica or Frances Schumacher, which indeed she was and I already had her in my tree. The next step showed Fronica's son Peter Van Bebber b. 1695, which was again correct according to the research already in my tree. But next it claimed that Peter's daughter was an Esther Van Bebber b. 1707 who I had no record of and anyone with any kind of observation skills will immediately notice that it's highly unlikely Peter had a child when he was only 12 years old. So I don't know who has this lineage in their tree that the app is picking up, but it's probably incorrect and it's a good thing I checked it before accepting it as fact. Looks like I'm probably not related to Nat King Cole after all. Bummer.

The good thing about the app is that it does use words like "Possible Common Ancestor" so hopefully people don't take it too seriously without researching and confirming connections. Additionally, at the bottom of each pathway (either from you to the ancestor, or the famous person to the ancestor), it asks "Does this path look correct to you?" and offers a thumbs up or thumbs down (shown below). Unfortunately, it doesn't offer any kind of comment box for you to detail what looks wrong about it if you thumbs-down it, but it's better than nothing.


Also noteworthy is the one I found in which the pathway from me to a common ancestor who is in my tree may have been wrong. When looking at the suggestion for my relation to Elizabeth Montgomery, we allegedly share known ancestors of mine, Robert Cobbs and Rebecca Vinckler - however, when I open up the pathway from myself to Robert, there is a very noticeable inconsistency with my own tree on Ancestry.com. In my tree (which the app is supposed to be working off of), Thomas Cobbs Jr is obviously the son of Thomas Cobbs Sr, who is the son of the Robert Cobbs in question, but in the app, it bizarrely has the mother of Thomas Cobbs Jr as Susanna Moon, who is then the daughter of Mildred Cobbs, the daughter of Robert.

Now, I supposed it's not impossible that the pathway in the app is correct and I just have yet to discover it, which would mean I am descended from Robert Cobbs in two ways. But that would also mean Susanna Moon married her uncle, and that sounds kind of gross and highly unlikely. I know it's not uncommon for 1st cousins to marry, but uncle and niece? It's not something I've ever come across (except in royalty/nobility, but that's different). Given the unlikeliness of this situation to begin with, and the fact that I have no record of Robert having a daughter named Mildred, I think this pathway is probably inaccurate. Even assuming for a moment it's correct, it's still strange that the app went with a pathway which is not in my tree instead of the one which is. So make sure you look at each pathway, even if the common ancestor is already one in your tree who you've confirmed. Don't just assume since the ancestor is correct, the pathway to you is as well. Regardless though, I am descended from Robert Cobbs, and so if Elizabeth Montgomery is as well, then we are indeed related, even though the pathway is wrong.

Although I have some criticisms of the app, it does give me a lot to do when I'm stuck on brick walls in my normal research. This gives me something different to explore, while still working on my family tree. Hopefully, as I carry on with it, I can continue to confirm or deny more and more relationships to famous people.

(Note: when you first set up the app, it will take a few days to look for and start generating people you're related to, and it will continue to update and add more and more people to the list over time.)

Sunday, October 4, 2015

How to Make a Descendant Report in FTM Excluding Living People

For obvious reasons, when producing a descendant report, we often want to exclude living people, or at least hide their details. FTM does, in a way, provide an internal way of doing this. You merely privatize your tree by clicking on File > Privatize. This hides personal details of whoever the system determines might be living (this is reversible using the same setting so nothing will be lost, but you should avoid syncing your tree while it's privatized in FTM because it can screw up your online tree).

Unfortunately, FTM doesn't do a very good job of this. In my experience, it wants to mark anyone born after 1895 without a death fact as "living", even though it's highly unlikely anyone would ever live to be 120 years old. This is contrary to the online tree, which marks people as living if they were born within 100 years and have no death data input, a much more sensible criteria, if you ask me.

So what if you want to customize the cut off point in FTM for your descendant reports and make it 100 years instead of 120? Well, there is a workaround for it but it requires several steps and creating a duplicate tree. Still interested? Read on.

1. Go to File > Export. This brings up a window that allows you to select which individuals you want to include in the export, so choose "Selected Individuals", shown right.

2. This brings up the window where you can choose who you want to include or exclude, shown below.

Click "Filter In" and you'll get another window where you can choose the criteria for who to include. To start, you'll need you to filter in everyone who was born after 1915 by selecting "Birth" in the fist drop down menu, then "date" in the bottom one, "is after" in the last one, and then typing 1915 in the text field, then click OK (shown below). This will include people born IN 1915, not strictly born after that year.

I know this sounds counterproductive because you're trying to exclude a lot of these people, but trust me, in order to exclude some of them, we first have to rule them all in.

3. Now click "Filter OUT" this time and exclude anyone who doesn't have a death fact. You do this by selecting "Death" in the first drop down menu, then "Any data" in the bottom one, and then "does not exist". You now have a list of people born after 1915 who are deceased (ie, who have a death fact).

4. Now click "Filter In" again, and include everyone who was born before 1915 by selecting "Birth", "Date", "is before", and type 1915 into the text field.

5. The only thing left to do is include everyone who doesn't have a birth date/fact, if you know that such people exist in your tree. Since we have only included people born before 1915, or after 1915 who are deceased, people with no birth fact will not be included if you don't rule them in. So click "Filter in" again, and this time choose "Birth", "Date", "Is Blank". Shown left.

This doesn't always catch all people with missing birth data though, so for good measure, also do a Filter In for "Birth", "Any Data", "Does not exist" (shown right). Don't ask me why you can't just do one or the other, you have to do both for it to be inclusive.

You can now export your tree with this list of people, which should include everyone except those born after 1915 with no death data. Save the file with a new name, so as not to overwrite your original tree. I call mine "Descendant Reports Tree" plus the date. Once exported (and I would not include media when exporting since you're only doing this for the sake of text reports), you can open the new file and now you have a tree that doesn't contain anyone born after 1915 who might still be alive. You can create reports from this tree without any fear of anyone living showing up. Yes, it does mean that you have to do this every time you want to update a descendant report, but it's the only way I have found to create a descendant report with a sensible or customized cut off point for living people.

Wednesday, June 3, 2015

FTM: Creating a Duplicate, Scaled Down Tree OR Splitting a Tree

With ventures into DNA in particular, I see a lot of people wanting to offer a scale down version of their tree, like a simple pedigree, but they may not know how. So I'm going to show you how to do so with Family Tree Maker. I'll be using FTM 2012 but I imagine other recent versions aren't going to be too dissimilar.

Export options
Step 1: Go to "File" > "Export". This will open a pop up window with your export options (shown right). On the right, you can choose options like include or exclude media - note that excluding any/all of the options, your source citations will still remain, minus any photos attached to them. You can also choose your output format as either an FTM file, or a Gedcom. I like to do mine as Gedcom because then I can directly upload it to places like Gedmatch.com or FTDNA, 23andMe, etc. I recommend not using the option to "privatize living people" since most sites you'll be uploading to do that anyway. But all these options are really your own choice.

Choose individuals to include in export
Step 2: In the same window, on the left you have the options for "Entire File" or "Selected Individuals". Obviously, exporting the entire file will mean exporting your entire tree. If you're trying to scale down a secondary version of your tree, choosing "Selected Individuals" is what you want. After a moment another window will pop up with a list of everyone in your tree on the left side, a bunch of buttons in the middle, and a blank list on the right (shown left). Make sure that you, the home person, is selected on the left (I scrolled down so you wouldn't see my own personal details highlighted for privacy reasons). 

Details of ancestors to include
Step 3: If you want to create your pedigree, which would be a tree of only your direct ancestors, all you have to do is click the button that says "Ancestors". Yet another pop up window will appear (shown right) with options on how many generations to go back and whether to include all parents/spouses or only preferred ones, and whether to include any descendants of these ancestors and if so, how many generations down the line. If you're strictly doing a pedigree, especially for DNA purposes, you'll probably want to choose only preferred parents/spouses, and UNtick the descendants to include. As for how many generations back of ancestors to include, I like to be comprehensive and include them all so I put in the number 999, which might be overkill but it assures it'll include every generation. Click "OK" and on the right hand side of the previous window (shown in Step 2), you and all your direct ancestors will now be listed as the individuals to be included in the export. Click "OK" again and now all those selected individuals will be listed on the original window show in Step 1. If you're happy with this, click "OK" again to export your new, scale down tree. You can then open it as a new tree in FTM (I'd name it something different so you can tell the two apart), or assuming you exported to Gedcom, you can upload directly to someplace like Gedmatch.com. If you want to include more people, not just your pedigree, read on...

Step 4: After adding your own ancestors, while still in the Step 2 window, you will find you can add individuals simply by double clicking their name on the left hand side (or single clicking it and then clicking the "Include" button) and they will appear on the right hand side. So let's say you wanted to include an aunt or uncle whose DNA kit you also manage. You can do so by double clicking their name. Someone like an aunt or uncle has the same pedigree as your parent, their sibling, so there's no need to hit the "Ancestors" button again. If you want to add the pedigree of someone who has different ancestors than you do, like a cousin or your own spouse, all you have to do is select their name and hit the "Ancestors" button again. If possible, I highly recommend creating a separate tree/pedigree for your spouse though, instead of combining them, since the two of you are not genetically related (hopefully), and so having your pedigrees combined might be misleading to DNA matches looking at your tree.

I hope this helps people who are trying to export only certain individuals from their tree into a new one. Any questions about it, feel free to ask below and I'll do my best to explain further.

P.S. - This method also works for splitting a tree. Instead of selecting yourself in Step 2, you will select the person where you want to split the tree from - i.e., the person who will be the home person in one of the new trees. For example, if you are splitting a tree to have one tree for you maternal side and one tree for paternal, you will choose either your mother or father. Or if you are splitting up your tree four ways, one for each grandparent, you will pick one of your grandparents. Then in Step 3, you will choose the options for "include all parents," "include all spouses," and "include ancestor's descendants" by (x) many generations. I would put in 999 generations like you did for the ancestor's generations to make sure it's all inclusive. Export the tree, and then do the same thing for the next person where you're splitting the tree (so if you chose your mother first, now you'll pick your father). Once you have exported a tree for each new home person, you can import them into FTM, check to make sure all individuals, data, media, etc was included, and then you can delete the old, original tree if you want to (you can always keep it as a back up option if things went wrong with the split).

Friday, November 21, 2014

Free Family Tree Software Review: Ancestris

Continuing in alphabetical order of free tree software reviews, this one is about Ancestris.

Upon opening Ancestris, there are options to take a tour of the software or use other learning tools. I decided to skip this and clicked on My Ancestris which then gave me the options to create a new genealogy or open an existing one. Creating a new one takes you through the first steps of setting up a new tree. Right off the bat, I didn't like this process, since under "modifications of properties" it had a section for making "jurisdictions" (locations) fields required and organizing the sort order (shown right). For new comers, this might be confusing as you may not yet be sure how to best set this up, and I found it totally unnecessary.

The fourth step is finally useful and has you enter the name and birth data for the first person in your tree, normally yourself. You also have the option to enter death data (leave blank for yourself, obviously) and occupation and residence. The last step has you enter the parents, spouse, and children details (and other relatives, oddly), but clicking on "Add his/her father/mother" first generates a popup box that basically tells you what you already know, that you're about to add the father of this person (shown left). It gives you the option of changing the person's ID number, which again is unnecessary. Just click proceed, and then you'll finally have the same options to enter the details as you did with the original person.

Another annoying feature is that when adding a mother, the married name is automatically put into the surname field (shown right). This is bad form because the standard in genealogy is to name women by their maiden names. A newcomer who doesn't know this might assume it's better to enter the married name since that is the default here so this could be very misleading and really screw things up for people who don't know better. I also noticed that surnames are automatically formatted to be in all caps (shown right). This is a format some people use but not all and there doesn't seem to be a way to change it if you prefer it without all caps. If there is a way to change this setting, like everything in this software, it's not obvious how to do so.

So far, the only positive thing about this software is that the place fields (and the name fields, though I don't know how useful this would be in practice) offer a drop down menu of previously used locations so if you have a lot of events in one place, you don't need to type them all out every time. That said, you wouldn't be typing out too many locations anyway because another let down to Ancestris is that the only facts/events that seem available are name, BMD, occupation, and residence (only one residence so you can not enter more than one location a person lived in). You can also enter a nickname and name prefix/suffix but no alternate names or any other alternate facts. All very limiting to detailing anything more than the bare, vital facts.

When you are finished with these steps, you can now view your tree, either as a pedigree (what they call a "Dynamic tree") or a family group sheet which they call a "Browser" (shown left and below). They don't make the tabs very clear what they are, they just have the title of your tree on every tab. I only figured out what they called the different views/tabs by looking at the "View" menu and matching the icons, which might be too small to make out quickly or easily for some.

On the left, you have your tree views, on the right you have the details of the individual selected, which you can view either as editable fields ("Ancestris Editor") or as an outline list ("Data Publisher") - again, the tabs for these different views aren't obvious what they are. On the "Data Publisher" view, there is another box below it titled "Individual" but it gets cut off and there is no scroll bar, you can only adjust the divider in between the two boxes to see more (shown below right).

The pedigree view (Dynamic Tree) is not much better, it's clunky looking and it took me a minute to realize the blank box below the two parents is meant to be for their marriage data. Another thing they don't exactly make very clear (shown right).

At the bottom, there's a list of immediate family members and their details. Again, the tab for it just lists the tree name instead of a description of the view type (shown right). Apparently this is called the "Entities Table", as listed under "View" in the top menu above the toolbar.

Adding more people to your tree is also not very intuitive. If I want to add the parents of an individual, that's easy enough because in the family group (Browser) view there are fields to click to add them. But let's say I want to add another child. I first looked around for an "Add" button but when I couldn't find one, I right clicked the individual while in pedigree (Dynamic tree) view and then hovered over "Individual (ID number)" in the menu that appeared. Another menu appeared from that, giving me the option to add various types of family members (shown left). This seems to be the only way to add someone who is not a parent, it's only available in pedigree view and only by right clicking and selecting an option that doesn't even describe the function it runs.

So what are the positives to this software?! Well, they do have a lot of charts and reports. If you already have a tree you build online and you're looking for some free software just to import your gedcom and generate charts and reports, this might work for you. But in terms of actual data management, especially for beginners to genealogy, this is NOT intuitive. Again, even just bringing up the charts and reports is not straight forward. It's easy enough to click on "View" and select "Lists and reports" but then it opens a blank new tab and you have to know to click on the correct icon that has a green triangle on it. That opens up a lists of reports you can choose from. Also be aware that a lot of the charts have to be output to a file like SVG and then displayed in a web browser instead of being displayed within Ancestris.

The only other positive is that it does support sources and even repositories. I know that seems like it should be standard on every tree software rather than a noted bonus, but as we've seen before, that's not always the case. However, this alone is not enough to make it worthwhile because yet again, adding a source is not intuitive. You can not add a source in the "Ancestris Editor" like you might think (isn't that what an editor is for?), even though there's a tab for it. Instead, you have to go to the pedigree view (Dynamic tree) and right click the individual, highlight "Individual (ID number)" and then choose "Add Source". But bizarrely, this won't add a source to the individual, it adds it to the whole tree! Despite the fact that each fact for each individual has a "Source" tab, I can't figure out a way to actually use these. I'm not saying it's impossible but I'm fairly computer literate so if I can't figure out how to do it, it's not intuitive in the slightest.

Pros:
  • Locations have drop down select of previously used places
  • Supports sources and repositories (limited though)
  • Lots of charts and reports

Cons:
  • Not intuitive or easy to use at all
  • Only basic, vital facts/events available to add
  • Not able to customize much (ie, no option to turn off surnames in all caps)
  • Woman's surnames default with married name (you can change it but it's bad form for the default to be married)

Conclusion: If you're willing to wrestle with the functionality of this software, the reports and charts might be worth it, for a free option, but there are probably better ones out there. I can see nothing else redeeming about this software, it's very hard to use even for a seasoned genealogist and computer user.

Rating: 1 out of 5 stars

Sunday, November 9, 2014

Free Family Tree Software Review: Ancestral Quest Basics

Ancestry Quest has a free "basics" version and a full $29.95 version. They have a detailed comparison on their website but I am only going to review the free version and compare it against other free family tree software.

When you download Ancestral Quest Basics, there is a form to fill out your details but note that it is no required. You can just click the download button. One annoying feature of this software right off the bat is that once installed, you have to reboot your computer before using it. Many years ago that used to be the norm but not anymore so already this software feel outdated. Before the software opens, it asks you to set a few preferences.

One of the benefits to this software is that it has a built in option to search Ancestry.com for records. If you have an Ancestry.com subscription, this might be beneficial. But then, if you have an Ancestry.com subscription, I would highly recommend using their own software, Family Tree Maker, since it has the ability to sync your online and offline tree, which isn't possible with Ancestral Quest.

Getting started options
It's also highly compatible with PAF - Personal Ancestry File which was created by FamilySearch.org. They have since abandoned their PAF software but it is still supported by Ancestral Quest, Legacy Family Tree, and RootsMagic, and will link to your online FamilySearch Family Tree, just like Family Tree Maker links with your online Ancestry.com tree. So the real benefit of Ancestral Quest is if FamilySearch.org is your favored online source.

Once you get passed all these options to enable or not, you finally have the option to create a new tree or open an existing one. There are several options, including things like importing from a gedcom or from your FamilySearch tree. I always start a new tree because I'm assuming most people interested in free software are newcomers to genealogy who may not have a tree built yet. It will ask you to name your tree and where to save it, and then again asks if you want to register (and buy) the full software.

Add/edit individual with pedigree view in background
Finally, you get a blank pedigree in which you can start filling in names. It shows you where to click to add the first person in your tree, usually yourself. This is beneficial for first time users who may never have built a tree before and don't know where to start. Clicking this brings up a popup box that allows you to input your details. I notice right away that Ancestral Quest allows you to add source citations for each fact by clicking on the "S" next to the fact. This is a definite plus over the previously reviewed Ahnenblatt software. The other benefit over Ahnenblatt is the ability to add more than just vital data and basic facts. As you can see in the screenshot to the left, you can click "add" under "other events" and get a huge list of different types of facts/events you can add to an individual. Clicking the "more" tab allows you to enter things like an AKA name, physical description, and cause of death. Some of these options are not always available with other free software. Ancestral Quest also has a tab in the individual's details for contact information, which is really only beneficial for living people in your tree. In pedigree view, when you hover over an individual's name, it displays a quick view of their BMD data (birth, marriage, death). To view more of their details, just double click their name and the window shown in the screenshot above left will appear again.

Family view tab showing immediate family of individual
Once you've created the first person in your tree, it jumps from pedigree view to the "family" tab, which basically shows the individual's immediate family. You can enter your parents from here or by going back to the pedigree view. When you click on "add father" and type in a name and click okay, a window to input his marriage details pops up, which is a little confusing because you haven't even entered the mother/wife's name yet! If you then enter the mother's name, the details of the father's marriage do seem to get added but I did not find this process intuitive at all.

The design of the software uses some largish fonts and buttons, which may be beneficial for those with poor eyesight but personally, I found that made it difficult to visually pull all the details together.

Along with the Pedigree and Family view tabs, there is a tab for "Name list" which lists all the people in your tree. The "Individual" and "Timeline" tabs are only available with the $29.95 version.

In the toolbar along the top of the screen, there are more options to play with your data. Some are restricted to the $29.95 version, such as "publish a family book" and the to-do list. The option to "edit individual" just brings up a person's details to edit, you can accomplish the same thing by double clicking their name in pedigree or family view. In addition to the list of all people in your tree, there are tools for search your tree by name, number, or relationship. There is also the option to merge two duplicate individuals, a more advanced feature you may not often see in free software.

The Basics version does allow you to create some reports and charts, though they are limited. You'll find them by clicking the printer icon in the toolbar, which may not be very intuitive. From here, there appears to be many options but once again, clicking print or preview on many of them brings up the option to upgrade to the full version. That can get annoying. Their website I linked to before details which reports and charts are available for which versions so I won't get into all that.

Exporting your tree only gives you options for various Ancestral Quest versions, Heritage Family Tree Deluxe, Family Tree Maker, PAF, and "Other", which apparently is code for gedcom. Why they couldn't call it gedcom is beyond me.

Pros:
  • Overall easy to use, with only a couple exceptions
  • Links to your FamilySearch family tree
  • Will search records on Ancestry.com
  • Has some features other free software may not, such as citations for facts and many event types
  • Offers some reports and charts

Cons:
  • Has many features which are only available in paid version but doesn't indicate that you can't access them until clicking on them (they could be greyed out to indicate no access but aren't) - the constant clicking on items not available gets annoying (though they make clear on their website what features aren't available with the free version, it's not like I have an eidetic memory)
  • Upon opening the first time, it asks you to set a lot of preferences that newbies may not know much about
  • One or two features are not hugely intuitive

Conclusion: An easy to use option for beginners but also allows some growth, not only with the free version but also offering more features with the full $29.95 version, which is affordable. Biggest benefit is being able to link your Ancestral Quest tree with your FamilySearch tree. If FamilySearch (which is free) is where much of your research is going to be, and you can put up with many features not available with the free version, this software is a good option to start with.

Rating: 4 out of 5 stars

Friday, October 31, 2014

Free Family Tree Software Review: Ahnenblatt

Many newcomers to genealogy don't yet want to spend money on a family tree program, which is understandable, so they want to know which free software is the best. I thought it might be beneficial if I were to review them each. I will work in alphabetical order and include lesser known software. If you're not interested in reading my full review, scroll down the bottom where I list the pros and cons, give a conclusion summary, and a rating.

This one is called Ahnenblatt. The prefix "Ahnen" comes from the German word "Ahnentafel" which basically means "Ancestor chart". Though this software is created by a German, it is available in English (as well as many other languages too) and "Ahnentafel" is the word used even in English genealogy for a report which lists one's ancestors (the opposite of a descendant report which lists one's descendants).

The creator of Ahnenblatt continues to update it, with the lately version 2.83 being last updated October 16, 2014. When you open it, it will have a blank work space with options along the toolbar at the top. You can select "Open" to open an existing gedcom, or you can click on "New" and start a new tree.

Starting a new tree
It is initially pretty straight forward and intuitive. Clicking on "New" opens a pop up window where you can fill in the details of the person you wish to start your tree with - probably yourself. The upper part of the pop up window has two tabs, one for "Person" and one for "Name". The person tab is where you type in vital data like birth, death, and gender - and you can also enter an occupation here. The name tab allows you to add a title, suffix, or nick name. There doesn't seem to be an option for an alternate name fact.

The lower part of the window has the option to add your parent's names. Strangely, when clicked the text field to enter their names, instead of just being able to type them straight in there, another window pops up saying "No father registered! Register father now?" Click "yes" and then another window pops up allowing you to type the names there. You can untick "show again" so the alert doesn't come up again but it still creates a new window for you to enter or edit parents' names, which is strange and unnecessary in my opinion. After entering both father and mother names, it asks you if they are married to each other. There are further tabs for inputting siblings, partner, children, etc. Under the partner tab it allows you to enter details of when and where they were married.

Pedigree view
Once you've input some initial names, clicking the check mark then creates a tree in a pedigree view. Clicking on any name in the tree will move the pedigree view to center on that individual and from there, clicking on the pencil icon above their name will open their profile where you can add or edit details. So initially, we only input the parents' names, now we can click on each one and input their vital data. Above the pedigree, it displays the individual's details in a white box, which is rather sloppy. It displays as a text box with a blinking text cursor if you click on it but you can not actually edit the details here, you must click on the pencil icon. Additionally, the white box displays all the info with only commas separating the different details.

Adding media. Yes, that's a picture of me from my wedding.
To the left of the pedigree is where the list of children for that individual is displayed. Clicking on a blank one allows you to add a child (in addition to being able to add a child from someone's profile). In the upper right corner it lists the last person you view so you can easily jump back, useful if you have a big tree. In the top left corner is a spot for an image of the individual. Clicking it will let you add an image to that individual (you can also open the individual's profile and click the "pictures/files" tab) but don't try to add more than one file at the same time or an error will occur. You can add more then one image but do it one at a time. You can select from the list which image you want to be the default on display.

Sources, a bit of a letdown
In an individual's profile, you can see there are also tabs for church, notes, and sources. This is where there's a bit of a let down for serious researchers, since there is no formatting of sources as citations, you just type whatever you want into the text box. There is also no way to attach a certain source or citation to a specific fact, all you can do is just list your sources like a bibliography. As such, I recommend manually formatting your sources in a standard APA or MLA style. If you need a refresher on them, I suggest using EasyBib where you can even just type in the details of your source and it will format it for you. If you join EasyBib (free) it will even save your citations.

Those are the basic functions of the software, and I found it mostly user friendly, even if not very aesthetically pleasing. The software's biggest downfall is the lack of many "event" facts aside from vital data - such as residence, military, immigration, etc. The "church" tab does allow you to input data for a baptism, confirmation, and funeral but there is no option, for example, to list where someone was living in 1940 or when they enlisted in the army. But is it a free program and the lack of the full features found on a program for sale is to be expected.

Places - lists individuals associated with location but not
facts/events associated with it
There are also other options in the toolbar to play with the data you've input. "Plausibility" checks to make sure you don't have any conflicting data - such as a child born after the mother's death. This is a great tool to have which you don't always find on a free software. The "Adjust" button allows you to format a few display options though not nearly enough, I would have liked to see a way to display first name first, then surname instead of the vice versa default which you can't seem to change.

"Places" allows you to see a list of the locations in your tree and the individuals associated with those locations, but not the specific fact for that individual the place is associated with. You can also add notes, sources, media, and even a zip/postal code and exact coordinates to a location.

Reports
Another feature this software provides that some freebies don't is the ability to create lists/reports and charts from your tree. It offers an ahnentafel report (ancestor list), a descendant list/report, a family list (a list of all people in your tree), a birthday list which is self explanatory, and a person sheet, which is a person report that lists the individual's vital data. It also creates charts including an "ancestor tree" or chart, which is like a pedigree - this is available in both poster and book format. The "family tree" chart is a descendants chart, and the "hourglass" includes both ancestors and descendants of an individual. These are only available in poster format but all include a few options to format fonts, style, etc. There are many other types of reports and charts which are not included but the presence of any at all is a bonus.

The "Search" tool allows you to search for anything within your tree - be it a name, a location, or a date. It's pretty useful in finding an individual in your tree but one thing this software is really lacking is a designated "home person". This is a standard feature in most family tree software that allows you to jump back to the home person at any time and view the tree from a set starting point. Normally, the home person is yourself.

You can save your tree in Ahnenblatt as a unique Ahnenblatt file but also as the standard gedcom, an HTML page/site, CSV, and others.

Pros:
  • Easy to use
  • Includes "plausibility" check
  • Includes some reports and charts
  • Ability to export to gedcom, HTML, CSV, and others

Cons:
  • Only basic facts/events available to add (no options for residence, military, immigration, etc)
  • No option to attach source citations to specific facts
  • Viewing places lists people associated with location but not facts
  • Preview of individual's data/events is sloppily listed in white text box above pedigree
  • No home person

Conclusion: Very basic starter software which is easy to use and has some good features but if you become more serious about your research, you will quickly outgrow it, particularly the way sources are handled and the lack of non-vital facts/events. The layout of the pedigree may also be cumbersome when dealing with a very large tree, especially with the lack of a home person.

Rating: 2.5 out of 5 stars.

Thursday, June 27, 2013

June 27, On This Day in My Family Tree...

I know I have been remiss in posting so I've come up with another feature which will detail events from my family tree that occurred on the same day as the post, however many years ago. I got this idea when it dawned on me that on December 7th of this year, my 2nd great grandmother died exactly 100 years ago. I don't think there's enough events in my tree to have each one be a milestone anniversary, like precisely 100 years, but I thought it'd be interesting nonetheless.

If you're interested in doing something like this yourself, I used FTM 2012 to create a calendar, including everyone in my tree. Just go to the "publish" tab and under "other" there will be the option for a calendar. On the right, under the options, choose "All Individuals". Also be sure to click the first icon in the toolbar row, shown to the left. Here you can customize what gets included (shown below) but I was a little disappoint that I didn't get the option to include any fact like I can with other reports. Only BMD gets included, I guess because they think those are the common anniversaries that people celebrate or mark. It's a shame they couldn't think of any other use one might have for a calendar, like this one! I would have liked to include facts like military enlistment, baptism, burials, immigration, etc. I wish FTM would add a feature that would basically be like a timeline of all the events in my tree. It's worth noting there is a Timeline Report but it's under "Person Reports" and is therefore only a timeline for one person. I realize a timeline of every event from every individual in a tree would be a lot of data but what use is a genealogy management program if it can't process a lot of data, right?

But I digress. The options you do have are things like how many months to include, whether to list people's ages or how many years it's been since that event, whether to use married names for females, etc. These are all up to you. The important ones that you make sure are UNticked are "Include births and marriages only if still living" and "Exclude marriage anniversaries if relationship status is "deceased". If you leave these ticked, you'll only get results for people still living.

You may wind up with a calendar full of names you can't remember, which is why I'll be looking up each person and getting more details of the event - but the calendar provides a quick and easy reference for finding what happened "on this day in my family tree".

So, on this day in my family tree . . .

118 years ago in 1872, my 3rd great grandfather Wilson S. Ramsey married his third wife Laura S. Vincent in Columbiana County, Ohio. His first wife, Susan Frantz, was my 3rd great grandmother.

And . . .

53 years ago in 1960, my 2nd great grand aunt (the sister of my 2nd great grandfather) Mary Louise Pike died in Ohio. She had never married.

Friday, May 10, 2013

FTM 2012: Preparing for PA Public Death Certificates

Following up on my previous post about Pennsylvania Birth and Death Certificates, I wanted to illustrate how you can use FTM 2012 (and probably some previous versions) to make a list of all the people in your tree who did or may have died in PA between 1906 and 1962, the current range of years for which PA death certificates are available to the public.

Go to the "Publish" part of FTM where you can create reports and charts and select "Custom Report" under "Person Reports". I changed the report title to "Pennsylvania Deaths 1906-1962".

Filter in all deaths which occurred in Pennsylvania
Choose "Selected Individuals" and in the pop up window, select "Filter In".

Think about the parameters you want to use. You need the list to be restricted to people who died in Pennsylvania so let's start with that. As shown in the example image to the right (click for larger view), make sure "Vital Facts" is selected, in the first drop down menu, choose "Death", the next one "Contains" and the bottom one "Place", then in the text field type "Pennsylvania". Click "OK". On the right, there should now be a list of everyone in your tree who died in Pennsylvania.

Filter out deaths before 1906 and after 1962
Next, we need to restrict it to deaths between 1906 and 1962. This is a two step process. We want to take the current list and remove anyone who died before 1906 and after 1962. So click "Filter OUT" this time and select "Death" for the first drop down box, "Date" for the bottom one, and "Is before" for the other one. In the text field, type "1906". Click "OK" and you've now filtered out all deaths before 1906.

Click "Filter Out" again, change "Is before" to "is after" and type 1962 and click OK. Now you have a list of everyone who died in Pennsylvania between 1906 and 1962.

Filter in all individuals who have no death data
But wait! What about all the people who you don't have any death data for but might have died in Pennsylvania within these years, people who you might want to find death dates for? Half the reason we look for death records is because we don't know when an individual died, right?

To do this, you need to go back to "Filter IN". With the first drop down box still set to "Death," in the bottom drop down box choose "Any Data" and in the second drop down box choose "Does not exist", as shown in the example to the right - then click OK.

Filter out any individuals who never lived in PA
because they probably didn't die in PA
You've now included everyone who has no death data entered which means you're going to have a lot of individuals who never set foot in PA or who were born too early or too late to have died between 1906 and 1962. This means we need to do more filtering out so choose "Filter out" again but this time, tick "All facts" instead of "Vital facts" and in the first drop down box, select "Residence". We're going to filter out anyone who never lived in Pennsylvania by choosing "Does not contain" in the second drop down box, "Place" in the bottom one, and typing "Pennsylvania" in the text field. Click OK.

Of course, just because someone lived in Pennsylvania doesn't mean they died there but it's the best we can do. If you don't know where someone died, all we can do is rule out the ones who probably didn't die in PA because they never lived there as far as we know.

Filter out any births before 1806 and after 1962, since
they probably didn't die between 1906 and 1962
Lastly, we want to rule out anyone who was born too early or late to have died between 1906 and 1962. So click "Filter out" again and go back to "Vital facts". Choose "Birth" from the first drop down menu, "Date" in the bottom one and "Is before" in the middle one. The date you choose is up to you - I figured most people don't live to be 100 years old so I put in 1806. Click OK. Now do it again but with "Is after" and the date changed to what you think is best - I went with 1962 because even though infant deaths were unlikely by this point, you just never know.

Click OK on both popup windows and FTM should regenerate the list in the preview window accordingly. It should now be a list of all deaths in Pennsylvania between 1906 and 1962 and of all people who lived in Pennsylvania and may have died between those dates. With the list, you know what names to look for in the PA Death Index. Of course, once the records are available on Ancestry.com, you'll probably gets lots of hints popping up but you can check with this list to find which ones didn't register a hint.

One last option: if you have a lot of people in your list who have no birth data and want to remove them, do another "Filter out" and set it to "Birth > Any Data > Does not exist" OR "Birth > Date > Is blank", whichever one you prefer.

If you want to save the list, click the last icon in the toolbar in the Options window on the right. This saves the editable list so you can always modify it later instead of recreating it but you can only access it in FTM. If you want to export a copy of it, click "Share" in the top right hand corner and choose "Export to..." - I usually go with PDF or, if I want it as a spreadsheet, CSV.

I hope this helps people who are researching Pennsylvania genealogy but remember, you can use this technique with any place or dates. I often find myself thinking "Who else in my tree might be found in this collection of records?" and I use this method to figure that out. If you are not confident using this method with different parameters on your own, feel free to ask me how to create a specific type of list and I'll post step by step instructions.

This is the kind of geeky crap I do on my days off from work!

Tuesday, January 22, 2013

Family Tree Maker: Relationship Calculator

You may already know about this one but for those who don't, this is a handy little tool in FTM that allows you to see the relationship between two people, which is especially useful if you have reason to want to know the relationship between two distantly related people in your tree and it's too complicated to work out yourself.

I recently I had reason to use this tool when I discovered that a half sister of one of my ancestors married the half brother of another one of my ancestors. Yeah, try working that one out. Instead, I let FTM do the thinking for me.

While in the "People" view, select "Tools" and then "Relationship Calculator", shown left.

If you've already selected one of the two individuals you want to include, they should already show up when the Relationship Calculator opens. Probably, the other individual will be the home person. It doesn't really matter because you can change both individuals once in the calculator.

Just click the icon immediately the right of the individual's name, the one that looks like a folder with lines on it. Then select the names you want include and then their relationship should show below the names with the "path" of their relationship displayed to the right. If your situation is like mine, where there is more than one relationship between two people, you can choose which one to view in the drop down box where it displays the relationship. You can also click on the button at the bottom of the window which says "View Relationship Chart" - I found this visual path display easier to follow. All of this is shown in the screen shot to the right. You can print the chart but unfortunately you can't save it (and trust me, I've tried recreating it in the "Publish" section with the Relationship Chart - no luck).

In this case, there was no blood relation between husband and wife but the relationship calculator is also very useful for cousin marriages and working out their degree of relation. In these cases, you will see a name or names listed under the section "Nearest common relative(s)" and around the bottom right there will be numbers for Civil Degree and Canon Degree which are the degrees of relation as defined by Civil Law and Canon Law.

By the way, the hardest thing about doing these FTM tutorials is making sure I haven't inadvertently displayed information about living people in my tree when taking the screen shots!

Saturday, December 15, 2012

Family Tree Data Analysis with FTM 2012 and Spreadsheets

One of the things that so interests me about genealogy and history is statistics that help show us how people live their lives. At what age did they typically marry and start having kids? At what age did they have their last child? How many children did they have in total? If you want to exam the answers to these questions within your own tree and look at the data without having to go through your tree manually, you can do so with software like Family Tree Maker. Other brands may have support for this too but since I only have FTM 2012, that's what I use to show you. This should work for some earlier versions of FTM as well though.

Selecting a custom report. Click to enlarge.
Step 1: You start by going to the "Publish" tab - I find this a rather misleading term to describe reports and charts so I'll start with this step.

Step 2: Make sure that the small pedigree chart at the top showing you which individual from your tree is selected is on yourself or the "home" individual.

Step 3: You should find a list of different types of reports and charts available on the left. Select "Person Reports", then "Custom Report". To the above right is a screen shot showing you these steps - don't mind the black boxes over the pedigree chart, that's just to protect the privacy of living individuals.

Items to include icon.
So with the Custom Report open, we have to customize the custom report. Step 4: Click the icon for "Items to include" - this is the first icon in the little row of them under where it says "Custom Report Options".

This will bring up a list of facts with the option to add or remove them, plus some flexibility in what to include with/of each of those facts. On the right are some general options that will apply to all facts and under the list of facts it will have a button saying "Name Options" (Name being the first fact highlighted, click on other facts to get the same option for them) and within this you can customize each fact.

Adding facts to include.
But first - Step 5: Click the plus icon and in the new window select "Age at birth of first child" and "Age at birth of second child". If you'd like, you can also scroll down and select "No. of children".

Next, I went into the birth, marriage, and death fact options and made sure "Description" and "Include 'in' before place" were deselected (they might already be deselected by default, I can't remember since I have long since played with the settings). This is a personal preference, you don't have to do this, I just found it unnecessary data for this purpose and therefore it was cluttering. I've included a screen shot of this below even though it's not a necessary step. Feel free to customize any other settings - notice that in step 5 (above) I've also deselected options like "Include person notes".

Minimizing "clutter" by removing irrelevant data is optional
Again, I just find this kind of thing unnecessary clutter but some people may rather have every piece of information available, even if it's not relevant to this specific report. You could even go as far as removing the birth, marriage, and death facts altogether but I prefer to have some reference for the time frame in which the individuals lived so I keep them in.

So we've added the facts we want included, now we have to customize the individuals from our tree we want included. This is done under the right panel in "Custom Report Options" (shown below).

This is also personal preference; you can choose "All individuals" or "Selected individuals" ("Immediate family" is an option as well but probably too restrictive for this purpose). If you choose all individuals, you can skip step 6 but while we're here, also note that you can change the title of your report, which I have (shown right).

Step 6: When you choose "Selected individuals", a new window should pop up (if not, just click "Individuals To Include"). Click "Ancestors" (shown below) - this will include all your direct ancestors (making sure you indicate a sufficient amount of generations to include everyone - to be safe, I make sure it says 999) and, if you choose, also include other descendants of those ancestors and how many generations you want to go down. I usually stick to one generation but keep in mind this will include individuals who don't necessarily have children.


We're now done customizing the report - if it doesn't generate automatically, just click "generate report", a button at the bottom of the Custom Report Options. At this point, you could stop and just save and use the report as it appears in FTM. You can print it or save it as a PDF. However, depending on the size of your tree, you may find the file is 50+ pages long! How do you sort through all this data to learn from it? This is where spreadsheets are beneficial and the next part of this will explain how to export the data to a spreadsheet and use it effectively. Unfortunately, I don't have Microsoft Office at the moment so I will be using an Open Office spreadsheet instead of Microsoft Excel but whatever you're using, it should work similarly.

Step 1: In the top right corner of FTM, there is a button that says "Share". Click this and select "Export to CSV" (not to be confused with the American drug store CVS). A window will pop up asking you to choose whether to export the data as columns or rows. Pick columns.

Step 2: You'll then get the save window where you can choose where to save the file on your computer and what to name the file. This is all up to you.

Step 3: Once you've saved it, you'll get another pop up window asking you if you want to open the file - click yes and it should open in your default spreadsheet program. If you don't have one, you can download Open Office (it's free and safe) or you can upload to Google Drive/Docs.

Step 4 (shown right): Now, I can't say what happens in Excel but in Open Office, I get a Text Import window in which it's really important that under the section that says "Separated by", you make sure "Space" is unticked and "Comma" is ticked. If you don't, the data will be all over the cells and a big mess.

Step 5: You may find you have a lot of data for people who don't even have any children, which is kind of pointless for this task, if you mainly want to see the age of every individual at first and last birth. If you're happy with the information remaining, there is no need to do this. But as I've mentioned before, I hate clutter. So if you're like me, what you need to do is highlight the column for number of children and sort by descending. In the pop up window, choose "Extend Selection". This all shown below:


Now you can scroll down, highlight the rows for each individual who have 0 children and delete! Once your data is "clean", you can play around with sorting by age at first or last birth too and you can add up all the ages or numbers of children to get an average. If you're writing a family history, you can incorporate this information into it. I find it fascinating to see who and at what age the youngest and oldest person in my tree had children and what the average number of children was in my tree and how it compares to national stats from the times. Granted, you have to keep in mind that probably some of the families in your tree may not be complete and therefore you may have some people listed as only having one child when they actually had more that you haven't discovered yet. That will skew your averages - but it's better than nothing and you can always update it as you learn more.

This is just one example of how you can use these tools to manage and analyze your genealogy - you can apply these same methods to nearly any type of data within your tree. It really illustrates the kind of advanced management and analysis tools which are available with genealogy software in comparison with a simplified online tree. I often see people asking what the difference is and whether it's worth the money to buy software - this is a great example of why it is.